Technical Focus – Audio Design & Acoustics
Acoustic and Audio System Design for Small Rooms - Part 5
By - Rahul Sarma, CEO, Menura Acoustic Labs in collaboration with Sound Wizard

In the previous part, the article discussed frequency responses of speakers and how they relate to the listening experience. That discussion is the perfect overture to this next topic of interest – system tuning and optimization.
Crossover Point Determination
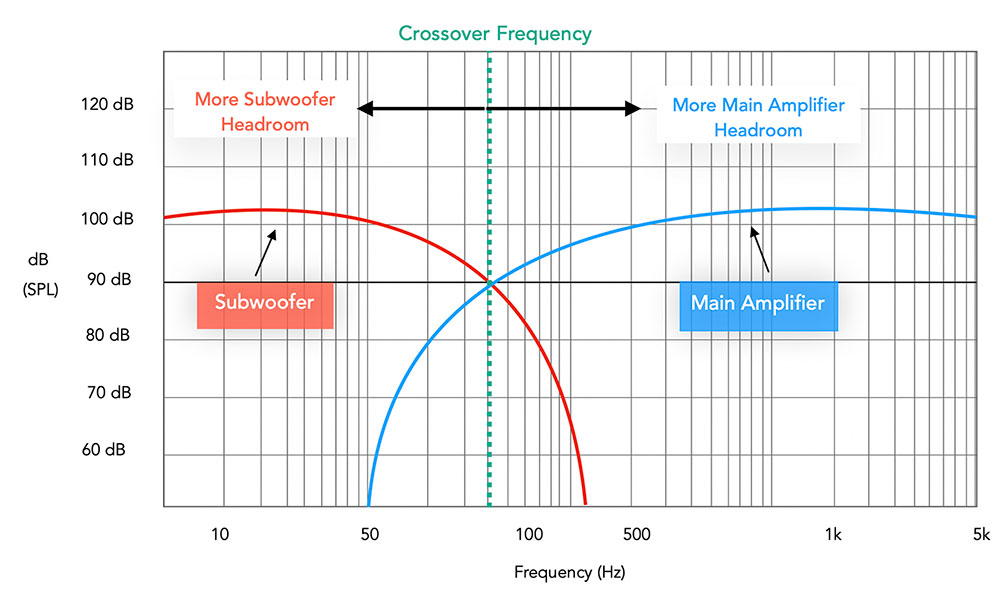
Before system optimization, crossovers have to be set (usually in a DSP) at selected frequencies. The crossover point is the cutoff frequency below which audio is sent to the subwoofer(s) and above which audio is routed to the mains and surrounds. There are multiple considerations to keep in mind when selecting this crossover point. It takes significantly more electrical power to reproduce lower frequencies than higher ones, so this is the first calculation you need to make. Based on how much headroom you have available on your amplifiers, or even the loudspeaker sensitivity, you may be forced to move the crossover point higher than you desire. There are a few drawbacks to higher crossover points which make them undesirable for reference quality systems. As opposed to mains and surrounds, subwoofers drivers are made with significantly larger diaphragms, which by their nature are usually too slow moving to have a good transient response at mid frequencies. Additionally, above 100Hz, we start to perceive sound a bit more directionally, which is sub-optimal (pardon the pun) for a truly immersive surround experience. Therefore, it is recommended to set crossovers at 80Hz or lower.

Fig 1: Headroom trade-off while selecting crossover frequency
Test Mic Placement
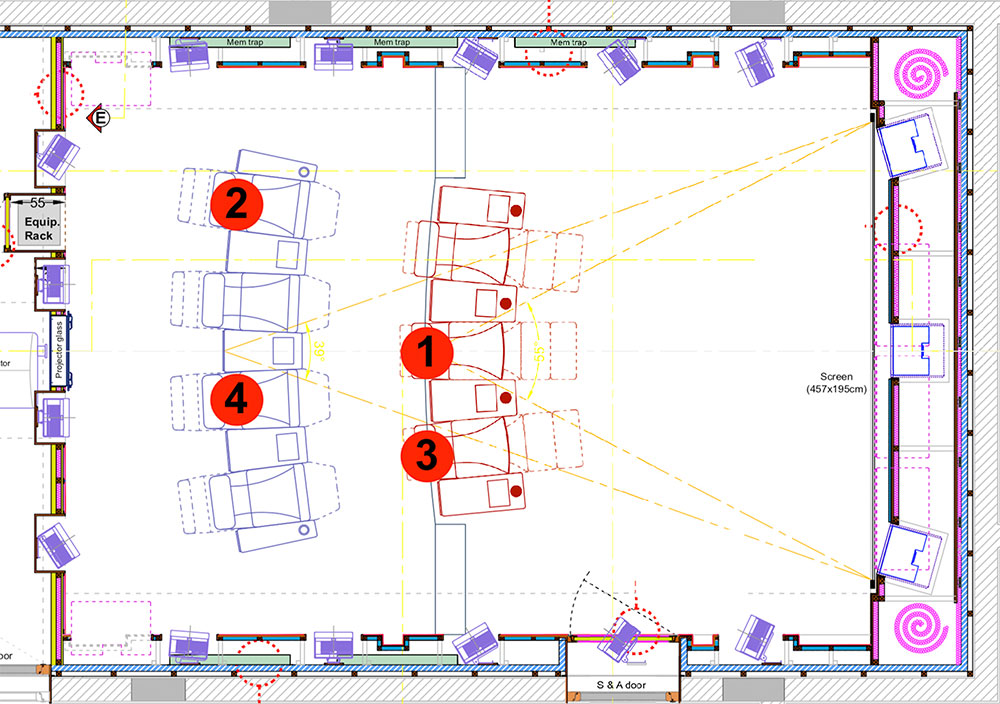
Once audio equipment has been selected and installed within a room, it is now time to optimize the system to the space. Using a single microphone in a single position is a common mistake made by people trying to optimize the ‘sweet spot’ of a room. Loudspeaker and room interactions always result in some tonal variation across listening seats in a room (pre-calibration), and tweaking a system based on a frequency response measured at a single position can very likely worsen the response at another listener seat in the room. That said, it is also unnecessary to measure responses at every listener seat, so it is important to select a few positions that tell you everything you need to know about the listening area. For example, in a reasonably symmetrical room, one need not measure both extremes of a single row. The image below shows a possible test mic configuration in a room.
One mic is in the sweet spot in the first row, and the opposite corners of the seating area get a mic each as well. The middle of the second row gets another mic for good measure, giving us a total of 4 microphone positions for 7 listener seats. There is no one right way to place the mics in a space, just try to get a good distribution of mics across the listening area. The mic placed in the ‘sweet spot’ (position 1) will be used to set speaker levels, but all mics have to be used for subwoofer alignment and system EQ.
Equalization
It is difficult to do this topic justice in a short article, so I will attempt to cover some of the best practices for equalizing a system. Firstly, and most importantly, one must understand the limitations of equalization. While it is tempting to flatten a curve using parametric or other EQ filters, one false step can lead to major system damage. EQ cannot be used to rectify room acoustical issues. It also should not be used to fix an apparent problem that is audible only at one seat. Rather, it should only be used for tonal shaping, to get a smooth and flat frequency response, as described in the previous article in this series. (http://www.palmtechnology.in/Article-87-Acoustic-and-Audio-System-Design-for-Small-Rooms-Part-4-by-Rahul-Sarma.aspx)
How do we identify the effect of room acoustics on a frequency response, so that we know to stay far away from it? That is where the multiple mics placed around the listening area come into play. If you have a dip in a frequency response measured in all the microphones, it is unlikely to be a modal issue, which would manifest at the same frequency in all listening positions, at different resonance levels. Even then, it is better to approach with caution and make only gentle changes to the spectrum. It is always more advisable to cut peaks in a response than boost dips, since any boost will eat into system headroom and move you closer to its limit.
The most common mistake made while system tuning is to try and boost a dip that is actually indicative of a nasty energy cancellation due to signals arriving out of phase at a specific position. Increasing the output of those frequencies doesn’t result in any visible change to the frequency response, so one might try to boost the same frequencies with an even higher gain. Before you know it, you have used up the system headroom and eventually fry the system as it runs near its limits!

Fig.2: Test Microphone Positions
System optimization
There are many other processes required to optimize a system for a particular purpose, and it is important to not take any shortcuts. We have only covered a small portion of system optimization, and even the topics we have covered like equalization take months/years of study and practice to truly master.
Time alignment, setting effective limiters to protect the system, creating presets for different ways of using a system and phase measurements are just some of the many other system optimization tasks. It is also worthwhile to test each speaker independently to ensure you have received them in working condition. Never assume that a speaker fresh out of a sealed box must be in perfect working condition. Drivers can be out of phase, and can sometimes even be damaged. It is worthwhile measuring the harmonic distortion curves of each speaker to compare with the factory datasheets. This will ensure that you start optimizing a working system.
Finally, the most important tools required to optimize a system are your ears. There is no substitute for a good ear, and the only way to truly create a good sounding system is to use a combination of measuring tools and critical listening to verify your work. Critical listening ability sets apart the good from the truly great system designers. It is something that can be developed and improved with practice and experience, and therefore needs to be given importance while honing your system optimization skills!